Thursday, July 31, 2014

Stretch

I am reluctantly pressing "publish" for this post. However, please know that the rawness and honesty in this post is aimed at making each and every one of us better at what we (both individually and collectively) do to support our students.

Kate wrote a great post the other day about some teachers coming out of TMC14 feeling inadequate. I support Kate's attitude and conclusion:
We are all good at some things and suck at other things. One thing we all share is the recognition that we all have work to do, and that we can all get better, and that focusing on that is worth our time.
I believe we need inadequacies and need to feel them at times because they make us better at what we're striving to be: the best teacher for our students. We don't need inadequacies to feel inferior to other teachers or generate some type of MTBoS worth. Here's how I think we all need inadequacies.

I started learning and exploring how to play the guitar in high school. I stunk. My family probably got tired of me playing Deep Purple's Smoke on the Water and Metallica's Enter Sandman all day. The first two riffs (and eventually songs) I learned. However, I practiced. A LOT. When I wasn't playing basketball, I practiced guitar. When I was supposed to be doing homework, I practiced guitar. There were guys at my high school who played guitar and were better. It made me practice more. It made me want to be better at something I loved doing.

When I got into college, my focus on guitar playing was similar. I was a lot better by this time, but still practiced a lot. When I wasn't working or going to class, I practiced guitar. When I was supposed to be studying, I practiced guitar. Then I joined a few bands and we practiced a lot. Not only did I continue practicing by myself, but now I practiced with others. That's awesome. We got better together! I would also jam with other guitarists who were better than me. Sometimes they were better so I learned a lot. Sometimes, I was better so I got to share some things and could relate. Every time I jammed with someone, it was a chance for me to improve at something I loved doing.

I loved going to concerts or watching videos of my favorite guitarists like Jimi Hendrix, Eric Clapton, or Warren Haynes. I wanted to cut my hands off many times because there was no way I would ever be as good as them. However, it only made me want to learn from them, steal some of their licks (guitar moves/techniques), and be the best I could be with their help and inspiration. I remember meeting James Hetfield from Metallica and was star struck. I thanked him for his inspiration. That's all I could muster up the intelligence to say. If I could jam with him I'd probably mess up A TON! But I'd never turn that opportunity down, because I'd learn a lot and he'd push me to get better.

Once during college, I was in Chicago at Kingston Mines blues bar hanging with my cousin. This blues/funk band, Charlie Love, was up there laying down some great songs. I went up at their break to compliment them and they invited me up to do a funk jam with them. I was completely honored and humbled at the same time. Here is this tall white guy trying to play funk with the Chicago blues/funk band and I did not play as well as I could have. However, I was grateful to meet them, I learned a lot from watching them, and it again made me want to go home and practice until my hands fell off.

For me, this connects so well with where I am as a math teacher. I am grateful for many other math teachers who have inspired me. There are many times I feel inadequate. Maybe I've met some of these math teachers and I feel like my brain shuts down. The best I can utter is some number and ignorantly nod my head in agreement. However, meeting inspiration and hanging out with inspiration has made me want to become a better teacher for my students.

Imagine there was an opening at your school and you could hire your teaching colleague. Would you turn down the chance to work alongside:
This is a snapshot of the many teachers who have inspired me and continue to raise the bar for me. I wouldn't turn them down because I might have some inadequacies. They would make me a better teacher for my students. Imagine if you were the teacher after receiving students from any teacher who inspires you? Imagine if you're the teacher before sending your students to a teacher who inspires you? Wouldn't you want to be the best teacher for your students? Isn't that healthy? Who wins? I would hope your students. 

I recently offered a keep-your-head-up comment somewhere saying,
"Think of the skills you will acquire when making changes."
My challenge to you (and myself), if you're feeling inadequate or inferior at any time is to:
  • take risks
  • be brave
  • tap into your influences and inspirations to stretch yourself
  • be the best teacher for YOUR students, not the MTBoS.
Stretch,
210

Wednesday, July 30, 2014

San Diego Conversions

I was in San Diego, California the past few days doing the whole San Diego Zoo and SeaWorld thing with the family. We had a great time, but that's not the point of the post. There were definitely a handful of opportunities to capture some math moments, but I've found it more important to contain myself (mathematically) when I'm with family and make the most of our time together. Here are the two things I captured and want to share.

Number 1: 
We were waiting to board the Wild Arctic Ride (virtual helicopter ride) at SeaWorld and watched this video. There were subtitles in Spanish for our spanish-speaking (reading) friends. However, they go along with the helicopter pilot.

Here's Act 1:

When I saw the the number behind the black box, I thought, "Is that right? Is 400 miles per hour really ### kilometers per hour?"
Are they correctly converting for our Spanish speaking friends? It turns out that 400 miles per hour is about 643.7 kilometers per hour.

Here's act 3:

What do you think? Should I keep the black box there? Should I delete it?
I feel this is one of those moments where I don't insert a black box and we simply ask students:
Is 400 miles per hour really 600 kilometers per hour?
I'm curious about students arguing about this one? or would they even care?
What difference would 40 kilometers per hour make?
Where do you stand, on any of it?

Number 2: 
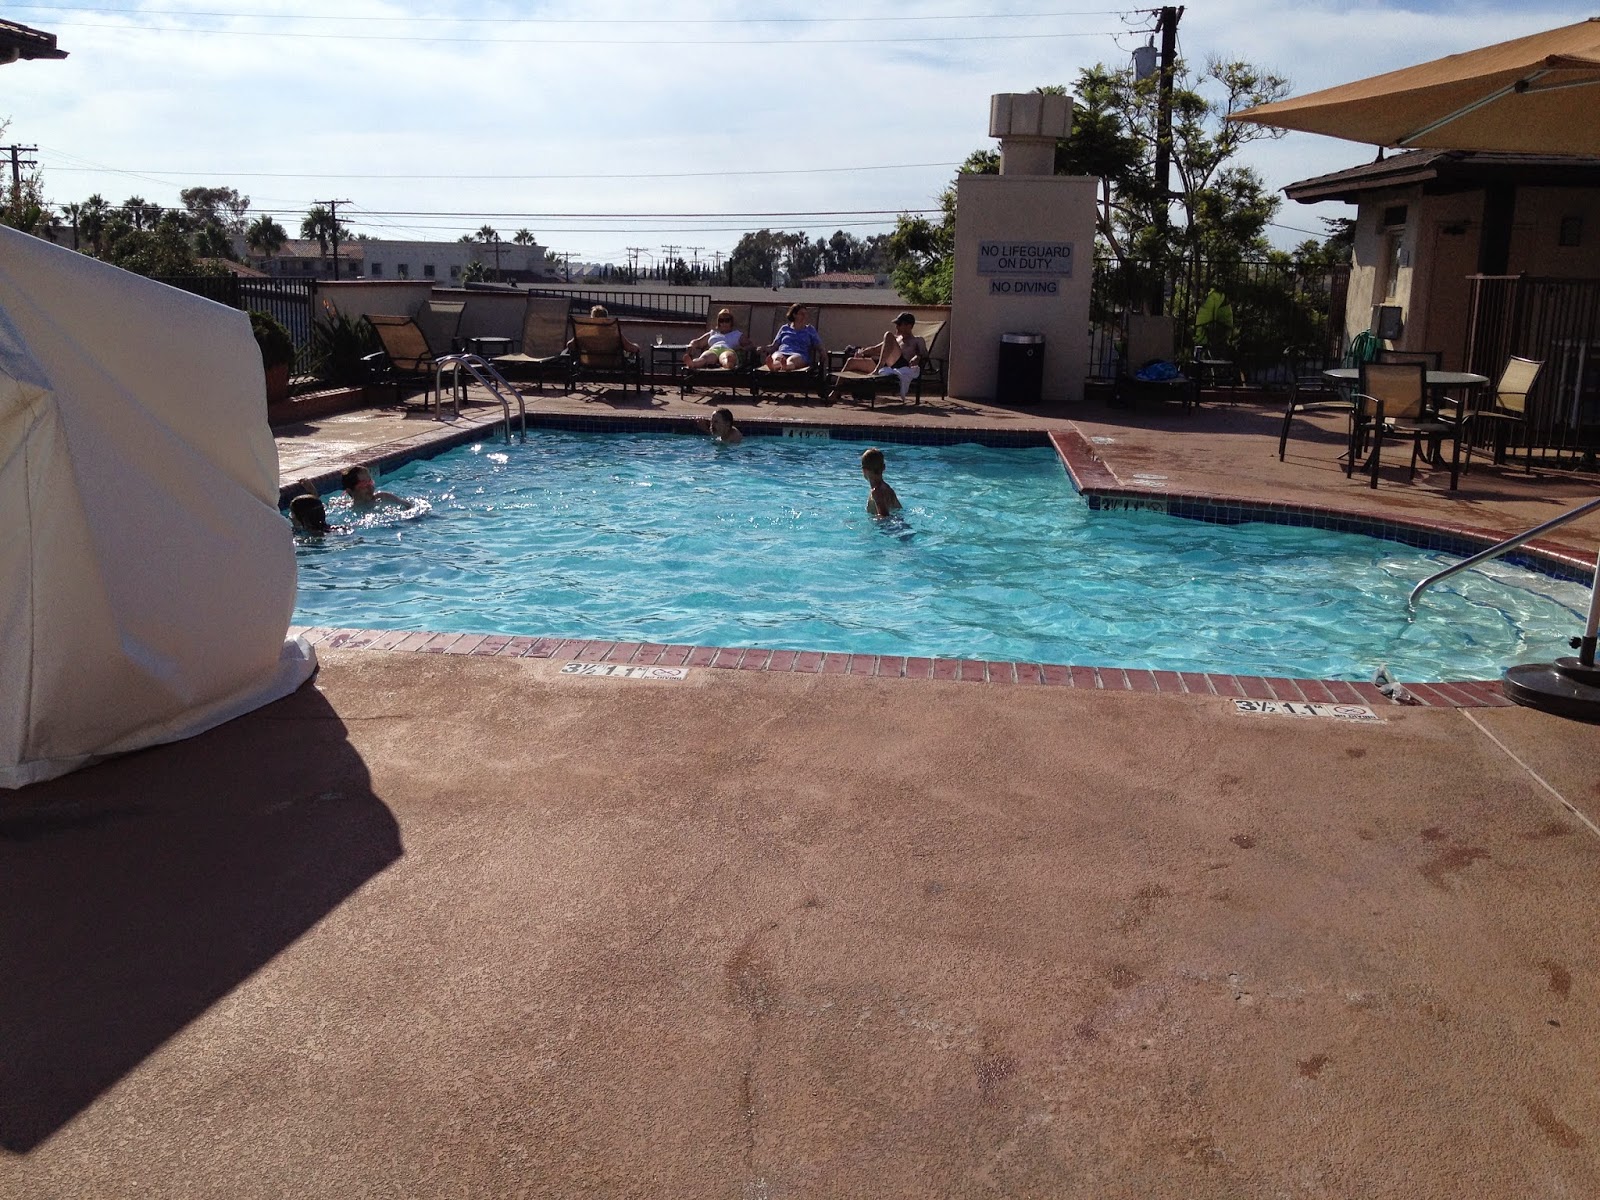
The great thing about San Diego is there are tons of people from many different places of the world. San Diego has an international airport and many places of interest besides SeaWorld and the zoo to contribute to this melting pot. I loved listening to all the different languages being spoken throughout the day. Therefore, it didn't surprise me when I walked into the pool area for the first time on our trip and noticed a few interesting things. I couldn't help but think how wonderful it would be to use these in any math classroom, specifically Math 6. The first thing you see as you enter the pool area is the jacuzzi. I couldn't help but notice the depth:
Okay class, check this conversion. It ends up making sense and I appreciate the use of meters for pretty much everyone outside of the United States. Seriously, I simply have such a hard time understanding why the United States uses inches, feet, yards, miles, etc. I digress.

Here's the (very shallow) pool:
Let's look a little closer at the depth signs around the pool. The deepest part of the pool is 4 feet or 1.2 meters. Okay class, check this conversion. Looks pretty legit, right?
So, if you saw a depth sign with 3.5 feet, what would you put the meters conversion at? How would you order these pictures with your students? Which would you present first? second? third? or would you give them all to your students at the same time? Would you cover up one of the measurements (like feet) and only show them one measurement so they work on finding the conversion. Here's the 3.5 ft depth sign.

Okay, if you do the conversion, 3.5 feet is 1.0668 meters. Obviously, someone was following their rounding rules. A few questions pop into mind here:
Should we round up?
Would it be wiser to round to 1 meter?
How much of a difference does roughly 4 centimeters make?
Could they not use a slightly larger tile and put 1.07 meters?
These questions aren't the only questions, nor the most profound, but I'm still curious.

There's one more crazy thing about this pool I had to capture and share. How did they get away with this? 
Look closely. Inside the pool is a depth of 4 feet (1.1 meters). Outside the pool is a depth of 3.5 feet (1.1 meters). WHAT?!!! Now reflecting, I should have had my wife take a picture of me next to the sign to get the water level and measure how deep it actually is here. I don't know about you, but 6 inches is definitely more significant than the 4 centimeters we discussed earlier.
At what point does an error like this matter significantly enough to change it? 6 inches? 2 inches? 12 inches? and in what direction: shallower or deeper?

How would you use any of these images or video in your class to help facilitate discussions or arguments regarding conversions?

SD conversions,
906

Tuesday, July 22, 2014

Des-man

Today, students had about 90 minutes to work on creating their Des-man. Des-man was the brainchild of Fawn. Desmos then teamed up with Dan Meyer and Christopher Danielson to create a suite of classroom activities, one of them being Des-man. I've done Des-man before, but not with the Desmos classroom. Let me just say, it's awesome!

As the teacher, I could see every students' work in real-time and display it up on the projector for all to see if need be. That's a really slick feature on top of the already amazing Desmos. It's like math euphoria! It was a blast to see students work 90 minutes straight, being as creative as possible with their Des-man (or Des-woman). After three weeks, Desmos became a very familiar tool for students because they used it with tasks like Barbie Bungee, Datelines, Hit the Hoop, Vroom Vroom, Stacking Cups, and more. I'd like to showcase a few creations for you. Enjoy!


Thanks Fawn, Desmos, Dan, and Christopher for a wonderful and creative math experience. Lastly, I want to thank my students. Today, you guys helped each other out, persevered, asked for advice, freely explored, had fun, and wanted to know more about functions, domain, range, circles, sliders, and more!

Desmos is great about asking for feedback. I have some observations and am curious. Maybe I'm missing something, but I noticed some features from the regular desmos calculator missing in the classroom. Maybe these are upcoming features:
Students couldn't duplicate functions. How come?
Students couldn't create (use) tables. How come?
Students couldn't create folders or text boxes. How come?
Students can't share their Des-man (email, link, etc.). How come?
As the teacher, I can't keep the Des-man (functions included) for each student. How come?
As the teacher, I'd love to have access to each student Des-man, especially if I want to send it to that student or share at a later time.
Thanks for listening, Desmos!

Des-manian,
1035

Monday, July 21, 2014

Tools: Helpful & Unhelpful

Not sure I made the best teaching move today, but I had to try it. We explored Dan Meyer's "Will it hit the hoop?" task(s).

Act 1: Roll "Take 1"
  • Agree on the question, "Will he make the basketball shot?"
  • Ask students to make a series of guesses for a total of six takes.
Act 2: Ask for information
I typically ask students to think of information they would find useful in answering the question. Today, I went somewhere else with Mathematical Practice 5. I asked students to make two lists:
  • List 1: Math tools that would be UNhelpful.
  • List 2: Math tools that would be helpful.
This is the fourth and final week of the summer academy. My students have been exploring many math tools. I'll list the activity/task with the prevailing tool(s):
As you can see, many of our tasks were dominated by slope-intercept and Desmos. I didn't find their lists surprising.

I love how some students thought Desmos would be helpful, while others thought it'd be unhelpful. Those that found it unhelpful, wished you could insert images into Desmos so they could use sliders to find the path of Dan's shots. Boy, were they happy when they discovered you could import images. My first class was split down the middle: half thought slope-intercept might be useful and half didn't. It took a few convincing students to explain why Vroom Vroom was an example where a linear function was unhelpful.

Overall, I'm pleased with this approach, but I wouldn't do it with every task. It might confuse students that there's only one way to solve a task and detract from the importance of MP 5. I thought this was a fitting opportunity for students to mainly see the difference between a linear function and quadratic function. Specifically, I wanted them to see the advantages of using sliders in Desmos with a quadratic function instead of a linear function. I think students need to shuffle through their tool belt often and pick the right tools for the right task. I think today it was necessary. Dan has written about this or breaking students' tools. Moving forward, it's a matter of using this strategy at relevant times and not overusing it. However, I might be wrong altogether. That's where it's your turn to chime in...

Tomorrow: Des-Man!


Tools,
1125

Sunday, July 20, 2014

Estimation 180 Gear

They're here! Estimation 180 t-shirts and stickers! Yes, I'm excited.

Estimation 180 was born out of my love for number sense and visual mathematics. In addition, it was important I help my students develop better number sense and see the world of mathematics in a different way. Little did I know, the site would make its way into classrooms across the United States, Canada, and other parts of the world. Thank you all for tweeting or emailing your experiences as I find it so cool that students are exploring number sense in your classroom and having mathematical conversations, sometimes even constructive arguments.

It makes my math heart full of joy to see other teachers do amazing things with Estimation 180 and beyond. Please make some time to check out blogs like Joe Schwartz, Jonathan Claydon, Mary Bourassa, and Megan Schmidt who are just a FEW of the teachers taking the idea and running with it. Teachers like MichaelHedge, DanRobert, John, Matt, and others spread the Estimation 180 love when doing teacher trainings or presentations. I couldn't be more appreciative and grateful. Thank you! Chris Harris even shared some bacon estimations to a roomful of parents one weekend.  I love how the site has become an instrument to help teachers create a classroom of curiosity with students, building number sense along the way. In addition to daily estimation challenges, the site has many of the lessons I've developed over the past few years.

These shirts are just another extension of my passion for number sense. As I present at conferences and give teacher trainings, I'm excited to give away some t-shirts to attendees nailing estimation challenges built into my workshops. Likewise, stickers are available for you to stick some number sense in your favorite place. This is how I roll!

I'm not in this to make money. This is more of a hobby to go along with the site. I would be eternally grateful if you decide to buy shirts and stickers and spread the Estimation 180 love. Head over to the Estimation 180 store and check out the shirts, their sizes, and how easy it is to order.

Nuts and Bolts:
If you're interested, I think it'd be good to be transparent on the nuts and bolts behind the t-shirts and stickers. If you're not interested in the nuts and bolts behind the t-shirts, skip the rest of this post and check out the t-shirts and stickers.

No outside party is financially backing Estimation 180. AND I don't plan on charging for using the site, ever! Therefore, I have done everything I can think of to make these shirts as affordable as possible, because I'm not in this to make money. Any money made from shirts and stickers would go back toward web costs associated with Estimation 180 and the free t-shirts and stickers I would pass out at conferences. As you can imagine, it's been one huge math task keeping track of expenses in order to set reasonable price points for the t-shirts and stickers so that teachers can afford them.

$20 for a shirt gets you a lot! You get a high-quality shirt for one. This price also includes tax and shipping. It also looks like I can throw in a sticker with each t-shirt order. Sweet! This $20 also goes toward the cost of the blank shirt, printing, mailing envelopes, and labels (mailing and return).

$2.50 gets you a high-quality sticker. This covers the cost of getting the sticker made, the envelope, labels, and postage. Of course, if you order two or three stickers, it's a better deal.

*Important note: my buddy Johnny from Speysyde was in charge of printing the t-shirts and he did a fantastic job! Please cruise by his site. It's all about the sustainable lifestyle:
Our mission is simple. To spread awareness and advocate an eco & social sustainable lifestyle through the creative collaboration of culture, music, sport, art, adventure & travel.
I declined using some of the premium web store features my host offers, such as shipping calculators, tax calculators, and other premium web store features. This drastically keeps the cost of the shirts at $20. For each purchase and transaction, Stripe takes a small percentage from my side. There is no additional cost to you. Their service, similar to PayPal, makes each transaction secure, safe, and easy.

I think you'll truly enjoy your shirt. I am!

Gear,
1047

Wednesday, July 2, 2014

Barbie Zip Line

Inspiration from Matt, John, and Jedidiah helped me shape my Barbie Zip Line task today. Whenever I prepare new tasks for my students, I have been trying to keep mathematical modeling, student ownership/creativity, performance tasks, and openness in the back of my mind. That's a lot, right? Plus, there's a hundred other little things, but let's focus on the list above. As I reflect on today, I'll share how I would improve this for next time.

Supplies (in order of attachment):
  • Barbie doll, or an action figure like G.I. Joe, Superman, or Captain America
  • Velcro: One-wrap (don't get Sticky Back)
  • Carabiners
  • Swivel Spring Snap (optional)
  • Fixed Pulley
  • Rope (thin enough to fit through the pulley)
My first piece of advice after learning from today: don't skimp on the pulley system. I made two and I should have made (bought) more. I would spend the money and have enough pulley systems for the number of groups you plan on having. Second, you could connect the pulley straight to the carabiner and avoid using (buying) the swivel spring. Third, velcro (harness) is the best way to quickly attach your pulley system to the zip line rider.

Buy enough rope so that you can have lengths that are 10 feet apart. In other words, have different rope lengths: 30 ft., 40 ft., 50 ft., 60 ft., etc. This will play well into the mathematical modeling part of the task (see below). It will also help make it easier to get the pulley systems on and off of the zip line. Solving the task yourself will also help determine the rope lengths you'll need for your school site.

The task (handouts found here):
Depending where (and who) you teach, some students have been zip-lining before. Ask! It never hurts. Maybe they can share their experience. Plus, this gives you a chance, at some point (if you feel necessary), to talk about how they're sitting in front of you, ALIVE, because someone was able to do some solid math and build a sound enough structure for them to zip line on. Just sayin'.

I low-balled my students today on their budget. I should have raised it to $2500 or $3000. Figure out what will work for your site. However, this mistake allowed me to give some early finishers an extension: find a more reasonable starting budget.

Here are the opening costs of your zip line company:
Students had to receive approval from their Summer Academy principal by showing their designs. I highly encourage this move. Students see someone else taking a vested interest in their learning. The principal gets an informal glimpse of your classroom. And students have to be prepared to explain the math and their problem-solving approach. If your principal is unavailable, get someone else: teacher, custodian, campus security, etc. It could be you, but you're already doing the formative approval (assessment) in class.

All these prices can change depending on your tastes. I included a liability insurance just for fun. The materials for the harness and pulley system need to be of high quality, so don't make them cheap. $50 might have been too cheap. The most important material is the steel cable (rope). This will help create multiple solution strategies. It's beautiful. Overall, I was pleased with my price points.
I found that having students create three rides is essential to this task. At least three rides. Sometimes tasks generate such a strong focus on the ONE CORRECT WAY to construct an answer or problem-solve. This adds pressure and can rob students of discovering mistakes or playing around with numbers. By creating separate zip lines for both certain death and boredom (getting stuck), it does many beautiful things.

Students innately know what type of zip line would kill barbie: a steep zip line. They can sketch that on their whiteboard, no problem. On the flip side, students have a good understanding of a boring zip line: practically a horizontal line. They can also sketch that on their whiteboard. Both sketches can be done without using numbers, formulas, or mathematical notation. It creates an entry point for all students. So here's what they had to say:
Leyla: We have a chance to see what not to do.
Trevor: It reminds me of when we do Estimation [180] and you ask us to give a too low and too high. It helps us find a reasonable number in the middle.
Deena: It shows us what a wrong answer or zip line would be.
Students were able to draw steep zip lines, label the height 20 feet, guess the ground distance to be about 5 or 10 feet, and use the Pythagorean Theorem to calculate the length of the cable (hypotenuse).
Mathematical Modeling and Multiple Solutions:
Students were able to design their own zip line by playing around with the numbers between their certain-death zip line and boring zip line. I told them to dream big on the whiteboards as if money wasn't a factor right now. Most did. Most.

I had a couple groups first figure out the cost of all the materials ($700) and subtract it from the $1500 budget, giving their group $800 to spend on cable. With $20/foot, they could use 40 feet of cable for their zip line. They identified the height and the hypotenuse of the right triangle. Impressive.

One of these two groups felt this wasn't enough cable and it was still too steep. Michelle had been zip-lining in real life so she knew. This was my mistake, but it turned into an opportunity for me to extend this task. I asked them to create a new budget for me so the cable was longer, but within reason. If you need more of an extension, have them come up with a formula to determine the amount of cable and distance on the ground, given a specific amount of money.

Before they could go outside and test their zip line, students had to complete this list:
I had students transfer their work to their graph paper composition books before they took it to the principal. I'll insert some pictures:

Here's the permit:

It was a blast! Students loved it. Here's another extension:
Have students design a system that gets the pulleys and/or dolls back up to the top of the zip line.

[insert video here]

By the way, I did teach the Pythagorean Theorem in there somewhere. Where? You might ask. I don't remember: ALL throughout the task. Use discretion. Some students need it first. Some need it after you've let them mess around on the whiteboards.

Zip,
1152